

As Windows Server 2022 Preview is now officially released, I wanted to get my automated build of the Preview release in the home lab and ready to go for testing the newest Windows Server operating system. With this being said, one of the recent tasks I have been working on is creating a home lab Packer build to quickly spin up Windows Server 2022 clones as needed for testing and so forth.
Quick Hashicorp Packer tutorial
As just a quick overview, Hashicorp Packer is a self-contained executable like Terraform that allows producing quick and easy operating system builds across multiple platforms. Using Packer and a couple of JSON files, you can quickly spin up fully automated operating system images and convert these to templates in the case of VMware vSphere for use in your clone process that you may use with Terraform.
With Packer, you can even use it to schedule fresh builds of your operating systems used in production so you can always have an up-to-date and fully patched operating system ready to go at a moment’s notice. This helps to promote the DevOps style of operating your infrastructure so you can have “cattle instead of pets” in your environment.
Automated Windows Server 2022 Packer Build
Let’s take a look at the automated Windows Server 2022 Packer Build and see how you can easily put together a template for cloning off new Windows Server 2022 virtual machines. What files are needed? The files and versions I am using at the time of this writing are as follows:
Outside of downloading both Packer and Windows Server 2022 Preview build, you will need the following files:
- Variables file – JSON
- Build file – JSON
- Answer file – Generated from Windows System Image Manager (SIM) or copy mine below
- Custom script file(s) – optional
Other considerations and tasks you will need to complete:
- Copy the Windows Server 2022 ISO file to a vSphere datastore
- Copy the windows.iso VMware Tools installer to a vSphere datastore
Now, let’s take a look at the three main files that you need to pull off an automated Windows Server 2022 Packer Build.
Windows Server 2022 Answer file for the automated Packer Build
Like other automated approaches to installing Windows Server, the automated Windows Server 2022 Packer build requires an answer file to automatically provide answers to the GUI and other installation prompts that you normally see in a manual installation of Windows Server. Below is the Windows Server 2022 answer file that I came up with that works in my home lab environment.
A few things to note about the answer file below:
- Replace the key with the server key you want to use for Windows Server 2022
- Replace the passwords below that are listed for auto login and the Administrator account
- This answer file also enables RDP
<?xml version="1.0" encoding="utf-8"?>
<unattend xmlns="urn:schemas-microsoft-com:unattend">
    <settings pass="windowsPE">
        <component name="Microsoft-Windows-International-Core-WinPE" processorArchitecture="amd64" publicKeyToken="31bf3856ad364e35" language="neutral" versionScope="nonSxS" xmlns:wcm="http://schemas.microsoft.com/WMIConfig/2002/State" xmlns:xsi="http://www.w3.org/2001/XMLSchema-instance">
            <SetupUILanguage>
                <UILanguage>en-US</UILanguage>
            </SetupUILanguage>
			<InputLocale>en-US</InputLocale>
            <SystemLocale>en-US</SystemLocale>
            <UILanguage>en-US</UILanguage>
            <UserLocale>en-US</UserLocale>
        </component>
        <component name="Microsoft-Windows-Setup" processorArchitecture="amd64" publicKeyToken="31bf3856ad364e35" language="neutral" versionScope="nonSxS" xmlns:wcm="http://schemas.microsoft.com/WMIConfig/2002/State" xmlns:xsi="http://www.w3.org/2001/XMLSchema-instance">
            <DiskConfiguration>
                <Disk wcm:action="add">
                    <CreatePartitions>
                        <CreatePartition wcm:action="add">
                            <Size>250</Size>
                            <Order>1</Order>
                            <Type>Primary</Type>
                        </CreatePartition>
                        <CreatePartition wcm:action="add">
                            <Order>2</Order>
                            <Extend>true</Extend>
                            <Type>Primary</Type>
                        </CreatePartition>
                    </CreatePartitions>
                    <ModifyPartitions>
                        <ModifyPartition wcm:action="add">
                            <Order>1</Order>
                            <PartitionID>1</PartitionID>
                            <Format>NTFS</Format>
                            <Label>Boot</Label>
                            <Active>true</Active>
                        </ModifyPartition>
                        <ModifyPartition wcm:action="add">
                            <Order>2</Order>
                            <PartitionID>2</PartitionID>
                            <Format>NTFS</Format>
                            <Label>System</Label>
                        </ModifyPartition>
                    </ModifyPartitions>
                    <DiskID>0</DiskID>
                    <WillWipeDisk>true</WillWipeDisk>
                </Disk>
            </DiskConfiguration>
            <ImageInstall>
                <OSImage>
                    <InstallFrom>
                        <MetaData wcm:action="add">
                            <Key>/IMAGE/NAME</Key>
                            <Value>Windows Server 2022 SERVERDATACENTER</Value>
                        </MetaData>
                    </InstallFrom>
                    <InstallTo>
                        <DiskID>0</DiskID>
                        <PartitionID>2</PartitionID>
                    </InstallTo>
                    <WillShowUI>OnError</WillShowUI>
                    <InstallToAvailablePartition>false</InstallToAvailablePartition>
                </OSImage>
            </ImageInstall>
            <UserData>
			    <AcceptEula>true</AcceptEula>
                <ProductKey>
                    <WillShowUI>Never</WillShowUI>
                    <Key>11111-22222-33333-44444-55555</Key>
                </ProductKey>
            </UserData>
        </component>
    </settings>
    <settings pass="specialize">
        <component name="Microsoft-Windows-Shell-Setup" processorArchitecture="amd64" publicKeyToken="31bf3856ad364e35" language="neutral" versionScope="nonSxS" xmlns:wcm="http://schemas.microsoft.com/WMIConfig/2002/State" xmlns:xsi="http://www.w3.org/2001/XMLSchema-instance">
            <TimeZone>Central Standard Time</TimeZone>
        </component>
        <component name="Microsoft-Windows-Deployment" processorArchitecture="amd64" publicKeyToken="31bf3856ad364e35" language="neutral" versionScope="nonSxS" xmlns:wcm="http://schemas.microsoft.com/WMIConfig/2002/State" xmlns:xsi="http://www.w3.org/2001/XMLSchema-instance">
            <RunSynchronous>
                <RunSynchronousCommand wcm:action="add">
                    <WillReboot>Always</WillReboot>
                    <Path>a:vmtools.cmd</Path>
                    <Order>1</Order>
                </RunSynchronousCommand>
            </RunSynchronous>
        </component>
		<component name="Microsoft-Windows-TerminalServices-LocalSessionManager" processorArchitecture="amd64" publicKeyToken="31bf3856ad364e35" language="neutral" versionScope="nonSxS" xmlns:wcm="http://schemas.microsoft.com/WMIConfig/2002/State" xmlns:xsi="http://www.w3.org/2001/XMLSchema-instance">
            <fDenyTSConnections>false</fDenyTSConnections>
        </component>
        <component name="Networking-MPSSVC-Svc" processorArchitecture="amd64" publicKeyToken="31bf3856ad364e35" language="neutral" versionScope="nonSxS" xmlns:wcm="http://schemas.microsoft.com/WMIConfig/2002/State" xmlns:xsi="http://www.w3.org/2001/XMLSchema-instance">
            <FirewallGroups>
                <FirewallGroup wcm:action="add" wcm:keyValue="RemoteDesktop">
                    <Active>true</Active>
                    <Group>Remote Desktop</Group>
                    <Profile>all</Profile>
                </FirewallGroup>
            </FirewallGroups>
        </component>
        <component name="Microsoft-Windows-TerminalServices-RDP-WinStationExtensions" processorArchitecture="amd64" publicKeyToken="31bf3856ad364e35" language="neutral" versionScope="nonSxS" xmlns:wcm="http://schemas.microsoft.com/WMIConfig/2002/State" xmlns:xsi="http://www.w3.org/2001/XMLSchema-instance">
            <SecurityLayer>2</SecurityLayer>
            <UserAuthentication>1</UserAuthentication>
        </component>
		<component name="Microsoft-Windows-ServerManager-SvrMgrNc" processorArchitecture="amd64" publicKeyToken="31bf3856ad364e35" language="neutral" versionScope="nonSxS" xmlns:wcm="http://schemas.microsoft.com/WMIConfig/2002/State" xmlns:xsi="http://www.w3.org/2001/XMLSchema-instance">
            <DoNotOpenServerManagerAtLogon>true</DoNotOpenServerManagerAtLogon>
        </component>
    </settings>
    <settings pass="oobeSystem">
        <component name="Microsoft-Windows-Shell-Setup" processorArchitecture="amd64" publicKeyToken="31bf3856ad364e35" language="neutral" versionScope="nonSxS" xmlns:wcm="http://schemas.microsoft.com/WMIConfig/2002/State" xmlns:xsi="http://www.w3.org/2001/XMLSchema-instance">
            <AutoLogon>
                <Password>
                    <Value>Password1$</Value>
                    <PlainText>true</PlainText>
                </Password>
                <LogonCount>2</LogonCount>
                <Username>Administrator</Username>
                <Enabled>true</Enabled>
            </AutoLogon>
            <FirstLogonCommands>
                <SynchronousCommand wcm:action="add">
                    <Order>1</Order>
                    <CommandLine>powershell -ExecutionPolicy Bypass -File a:\setup.ps1</CommandLine>
                    <Description>Enable WinRM service</Description>
                    <RequiresUserInput>true</RequiresUserInput>
                </SynchronousCommand>
            </FirstLogonCommands>
            <UserAccounts>
                <AdministratorPassword>
                    <Value>Password1$</Value>
                    <PlainText>true</PlainText>
                </AdministratorPassword>
            </UserAccounts>
        </component>
    </settings>
    <cpi:offlineImage cpi:source="wim:c:/wims/install.wim#Windows Server 2022 SERVERDATACENTER" xmlns:cpi="urn:schemas-microsoft-com:cpi" />
</unattend>
The Windows Server 2022 Packer variables file
The Packer components are no different with Windows Server 2022 than any other OS. You will need a variables file and an actual Packer build file. First, let’s look at the variables file I am using. As you see below, the variables file contains all the pertinent information that is used for your vSphere environment to build the virtual machine template.
- Name variables.json
{
    "vsphere_server": "vcsa.cloud.local",
    "vsphere_user": "administrator@vsphere.local",
    "vsphere_password": "Secretpassword",
    "vsphere_template_name": "Win2022clone_withupdates",
    "vsphere_folder": "Templates",
    "vsphere_dc_name": "CloudLocal",
    "vsphere_compute_cluster": "vsancluster",
    "vsphere_host": "10.1.149.14",
    "vsphere_portgroup_name": "DPG-Servers",
    "vsphere_datastore": "vsanDatastore",
    "winadmin_password": "Secretpassword",
    "cpu_num": "4",
    "mem_size": "4096",
    "disk_size": "102400",
    "os_iso_path": "[vsanDatastore] ISO/en_windows_server_2022_preview_x64_dvd_3bd1e657.iso",
    "vmtools_iso_path":"[vsanDatastore] ISO/windows.iso"
}
Windows Server 2022 Packer build file
Next, is the actual Packer build file. The Packer build file will pull from the variables.json file. Pay attention below to the floppy files that are defined. Those files are:
- “setup/setup.ps1”
- “setup/vmtools.cmd”
These files are used during the setup of the virtual machine. I will detail their contents in the following section.
- Name win22build.json
{
"builders": [
{
"CPUs": "{{user `cpu_num`}}",
"RAM": "{{user `mem_size`}}",
"RAM_reserve_all": true,
"cluster": "{{user `vsphere_compute_cluster`}}",
"communicator": "winrm",
"convert_to_template": "true",
"datacenter": "{{user `vsphere_dc_name`}}",
"datastore": "{{user `vsphere_datastore`}}",
"disk_controller_type": "lsilogic-sas",
"firmware": "bios",
"floppy_files": [
"setup/win22/autounattend.xml",
"setup/setup.ps1",
"setup/vmtools.cmd"
],
"folder": "{{user `vsphere_folder`}}",
"guest_os_type": "windows2019srvNext_64Guest",
"host": "{{user `vsphere_host`}}",
"insecure_connection": "true",
"iso_paths": [
"{{user `os_iso_path`}}",
"{{user `vmtools_iso_path`}}"
],
"network_adapters": [
{
"network": "{{user `vsphere_portgroup_name`}}",
"network_card": "vmxnet3"
}
],
"password": "{{user `vsphere_password`}}",
"storage": [
{
"disk_size": "{{user `disk_size`}}",
"disk_thin_provisioned": true
}
],
"type": "vsphere-iso",
"username": "{{user `vsphere_user`}}",
"vcenter_server": "{{user `vsphere_server`}}",
"vm_name": "{{user `vsphere_template_name`}}",
"winrm_password": "{{user `winadmin_password`}}",
"winrm_username": "Administrator"
}
],
"provisioners": [
{
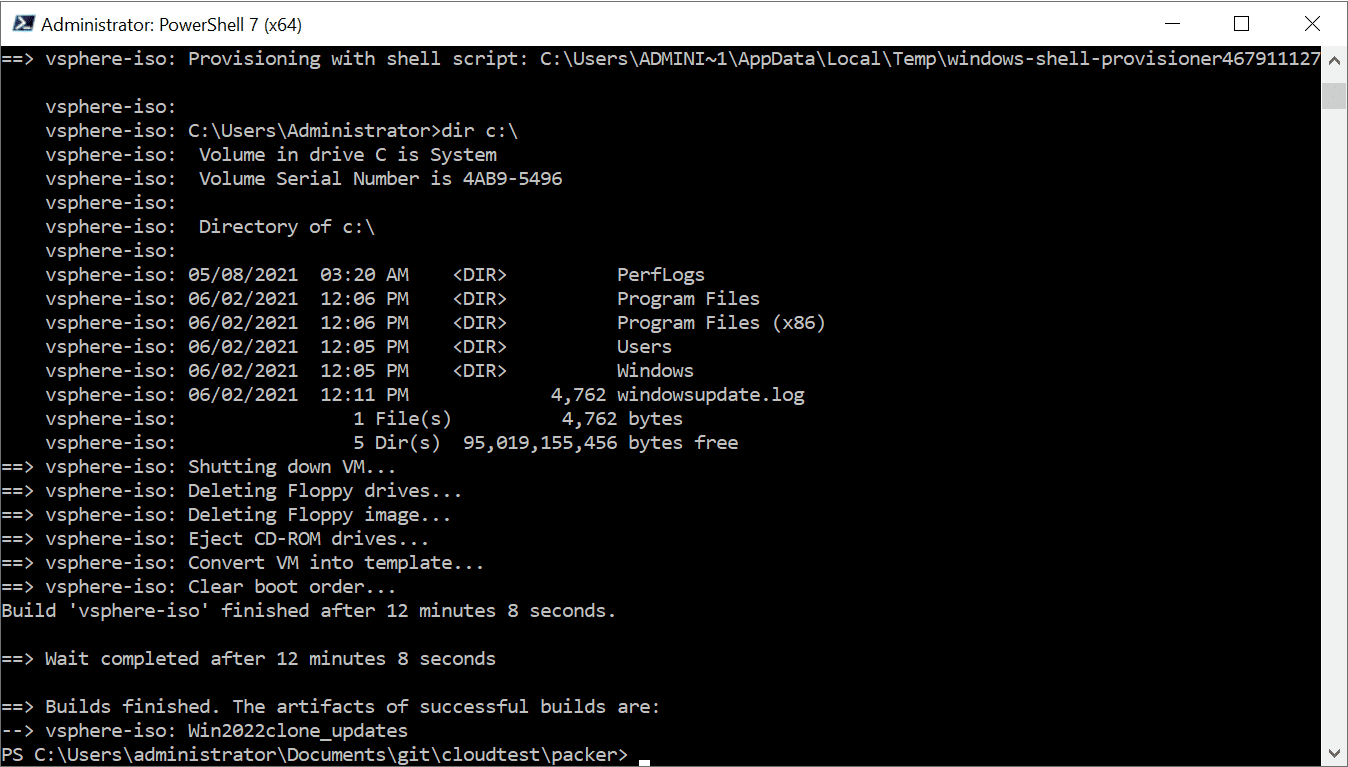
"inline": [
"dir c:\\"
],
"type": "windows-shell"
}
],
"sensitive-variables": [
"vsphere_password",
"winadmin_password"
],
"variables": {
"cpu_num": "",
"disk_size": "",
"mem_size": "",
"os_iso_path": "",
"vmtools_iso_path": "",
"vsphere_compute_cluster": "",
"vsphere_datastore": "",
"vsphere_dc_name": "",
"vsphere_folder": "",
"vsphere_host": "",
"vsphere_password": "",
"vsphere_portgroup_name": "",
"vsphere_server": "",
"vsphere_template_name": "",
"vsphere_user": "",
"winadmin_password": ""
}
}Other Windows Server 2022 Packer Build files
While all of these files are not required, they can help you to have a robust build process with your Windows Server 2022 template. These are the files that I mentioned above. You will notice I am calling these from a setup child directory contained in the directory that I have the Packer variables and build file.
- “setup/setup.ps1” – called in the section <settings pass=”oobeSystem”> of the autounattend.xml file
- “setup/vmtools.cmd” – called in the section <settings pass=”specialize”> of the autounattend.xml file
Notice the contents of those files below. You will see I am copying BGINFO in a not so elegant way as I had a customized BGINFO.ini file I am using. Also, you will see the setup.ps1 file is using the PS Windows Update Module to install all the updates available.
- setup.ps1
$ErrorActionPreference = "Stop"

# Switch network connection to private mode
# Required for WinRM firewall rules
$profile = Get-NetConnectionProfile
Set-NetConnectionProfile -Name $profile.Name -NetworkCategory Private

# Copy BGINFO and custom INI file
net use x: \\vserv01\packerbuild /persistent:no
xcopy /E X:\BGinfo "c:\program files (x86)\bginfo\"
xcopy X:\startup\bginfo.bat "C:\programdata\microsoft\windows\start menu\programs\startup"
"C:\programdata\microsoft\windows\start menu\programs\startup\bginfo.bat"

#Install PS Windows Update Module

Get-PackageProvider -name nuget -force
Install-Module PSWindowsUpdate -confirm:$false -force
Get-WindowsUpdate -MicrosoftUpdate -install -IgnoreUserInput -acceptall -AutoReboot | Out-File -filepath 'c:\windowsupdate.log' -append

#WinRM Configure
winrm quickconfig -quiet
winrm set winrm/config/service '@{AllowUnencrypted="true"}'
winrm set winrm/config/service/auth '@{Basic="true"}'

# Reset auto logon count
# https://docs.microsoft.com/en-us/windows-hardware/customize/desktop/unattend/microsoft-windows-shell-setup-autologon-logoncount#logoncount-known-issue
Set-ItemProperty -Path 'HKLM:\SOFTWARE\Microsoft\Windows NT\CurrentVersion\Winlogon' -Name AutoLogonCount -Value 0
- vmtools.cmd
@rem Silent mode, basic UI, no reboot
rem e:\setup64 /s /v "/qb REBOOT=R"
e:\setup64 /s /v "/qn reboot=ReallySuppress"
Running the Automated Windows Server 2022 Packer Build
Once you have the files created and in place (in the directories you want, etc.), all that is left to do is run the Packer build. To do that using the names of the files that I used:
packer build -var-file varswin2022.json win22build.jsonThe build will proceed and you will be able to see from the virtual machine console, if you have a connection open, the server will build, updates will be applied, and all the other configurations specified before powering down the Windows Server 2022 VM and converting it to a template.
Download the files from my GitHub Packer Repo
Hopefully, this walkthrough will show how easy it is using a few files to get up and running with a clean build of the brand new Windows Server 2022 Preview build which is available for download.


0 Comments