

I have been working with Kubernetes quite a bit lately playing around with the lab environment and learning the ins and outs of connecting to and working with K8s clusters. The kubectl command (sometimes pronounced “coob cuttle”) is the de facto command that you will use to interact with your Kubernetes clusters. I mainly use a Windows workstation as my daily driver for most other things, so getting kubectl up and running on my Windows box was the end-goal. There were a few little details along the way, but ultimately, this wasn’t too difficult. In this post, I will walk you throgh how to install kubectl on Windows and create kubeconfig file.
What is kubectl?
The kubectl command is the command that allows you as a Kubernetes administrator to control and manage Kubernetes clusters. Much of the administration you will do with the Kubernetes cluster will be done with kubectl. To configure your kubectl command-line tool, you use a file located in your $HOME directory that is known as the kubeconfig file. In this file the kubectl command is pointed to your Kubernetes cluster and other context information that allows you to manage the cluster.
Install kubectl on Windows and Create Kubeconfig File
To install kubectl on Windows and create the kubeconfig file, it will generally involve the following steps:
- Create a folder to contain your Kubernetes tools
- Add the folder location to the Windows PATH environment variable
- Download the kubectl command
- Create the .kube directory
- Create the Windows kubectl kubeconfig file
- Change the API version listed in the kubeconfig file
- Verify connectivity to the Kubernetes cluster
1. Create a folder to contain your Kubernetes tools
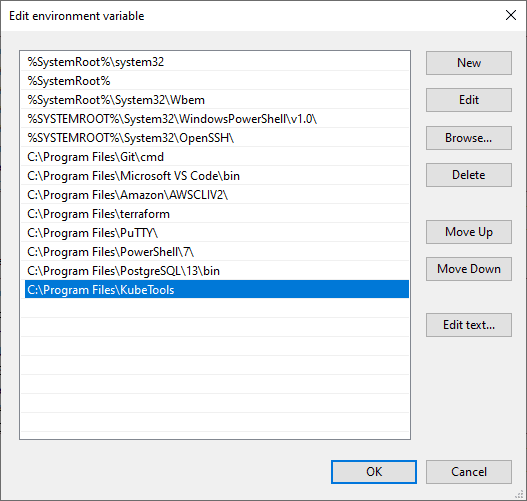
I like to create a folder that will house the tools used for Kubernetes. Many of these tools are self-contained executables that you can run from any directory. Examples include kubectl and helm. I like to create a directory called “KubeTools” which house all the tools I use for interacting with Kubernetes. This way, you just add one folder to your Windows PATH variable and you are good to go for any Kubernetes tool you place in the folder.

2. Add the folder location to the Windows PATH environment variable
After you have created the folder, add the folder to the Windows PATH environment variable. This makes it so you don’t have to navigate to the literal path of kubectl to run the command. You can simply type in the kubectl command from any command line context.
Docker Desktop for Windows adds its own version of kubectl to the Windows PATH. If you have installed Docker Desktop, you may need to place your PATH entry before the one added by the Docker Desktop installer or remove the Docker Desktop’s kubectl.
3. Download the kubectl command
After you have the folder in place and the directory in the PATH statement, you can download the kubectl command to your directory. To do you that, you run the CURL command below. Yes curl works in Windows 10.
curl -LO https://dl.k8s.io/release/v1.21.0/bin/windows/amd64/kubectl.exe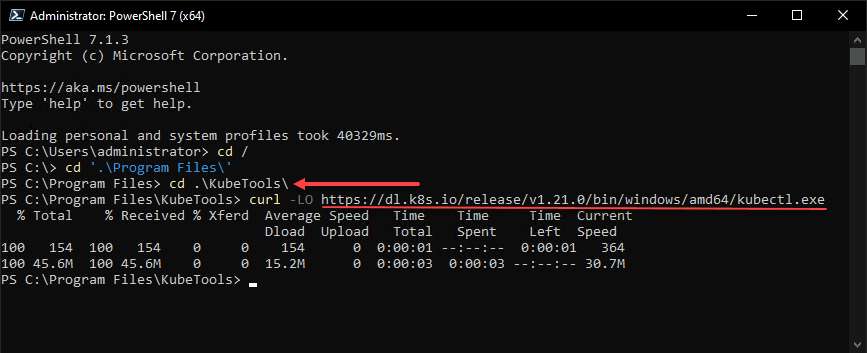
After you have configured the PATH statement and downloaded the kubectl command, run the kubectl command to verify you see the return from the command with the available parameters. This verifies the PATH statement is working as expected.
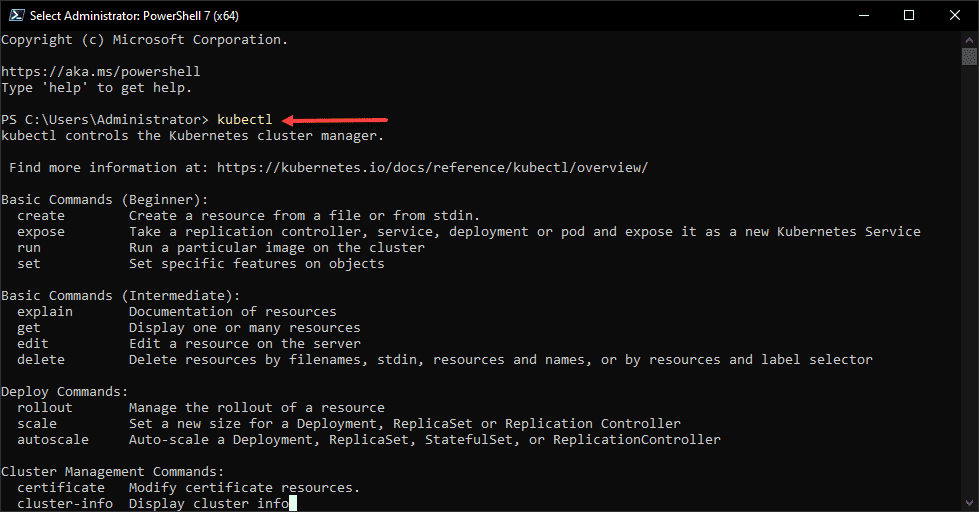 Running the kubectl command to verify windows path and other configuration
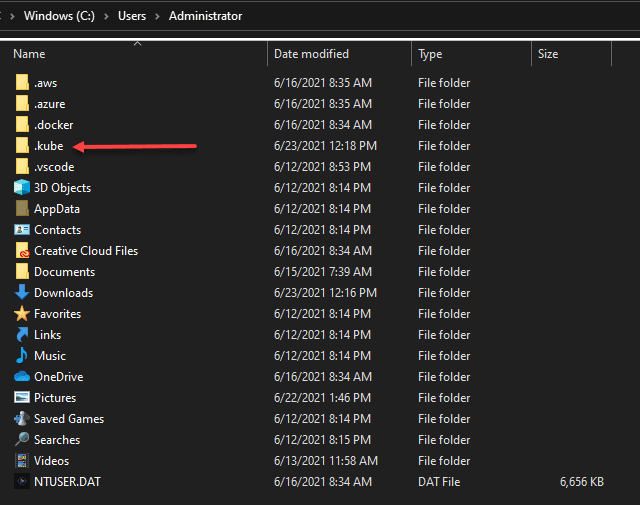
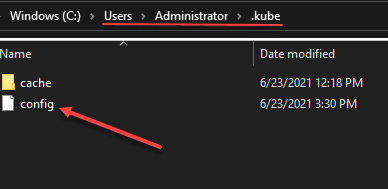
4. Create the .kube directory
Now that we have the kubectl utility downloaded and the Windows PATH statement in place to run the command from any command-line context, we need to create the directory the command looks to for the configuration. Kubectl looks at the path:
$HOME/.kubeFor Windows, this is the root of your %USERPROFILE% directory of the user that will be running the kubectl command. All you need to do is create the “.kube” directory in this directory.
5. Create the Windows kubectl kubeconfig file
Since the .kube directory is created, we now need to create the kubeconfig file that is needed for the kubectl command. The kubeconfig file contains the configuration needed to tell kubectl how to connect to the Kubernetes cluster. An easy way to “create” this file is simply copy the file that is generated on your Kubernetes hosts using the kubeadm command.
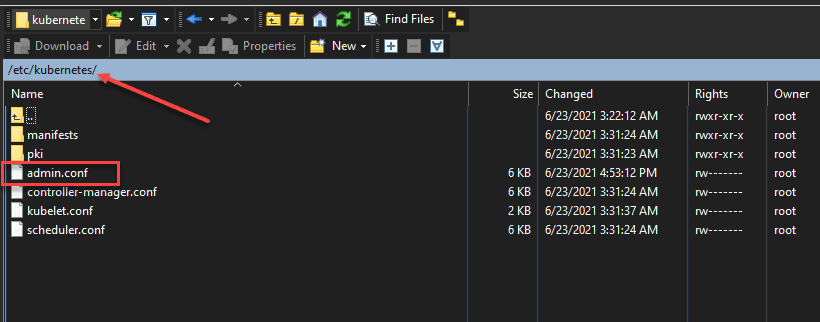
If you haven’t created your Kubernetes Lab environment as of yet, take a look at my post: Kubernetes Home Lab Setup Step-by-Step where I show how to build a Kubernetes lab environment using three Ubuntu VMs running in a vSphere 7.0 Update 2a environment. In that post, you will see how to configure your Kubernetes lab environment. After you have used kubeadm to create the cluster, you will have a valid kubeconfig file that can be copied to your Windows workstation to connect to your Kubernetes cluster. Where is this kubeconfig file located?
/etc/kubernetes/admin.confCopy this admin.conf file down to your %userprofile%/.kube directory that was created above. Rename the file to simply “config” with no extension.
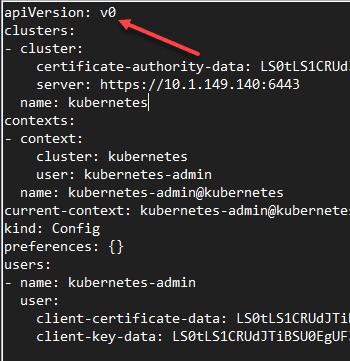
6. Change the API version listed in the kubeconfig file
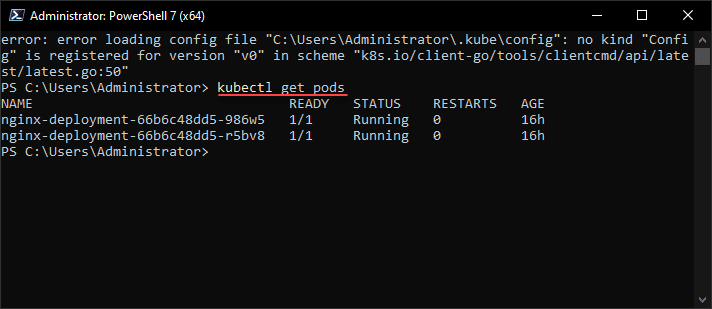
One little issue I ran into after copying down the kubeconfig file to the %userprofile%/.kube directory was the API version listed in the file errored out. Below is the error received.
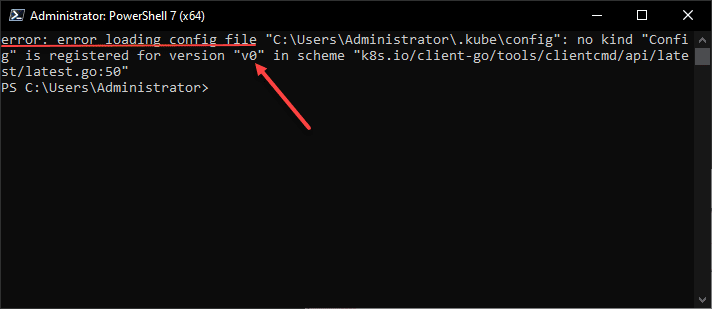
In looking at the kubeconfig file, it was indeed set to apiVersion: v0. I simply changed this to v1 and it resolved the issue.
7. Verify connectivity to the Kubernetes cluster
The last step is verifying connectivity to the Kubernetes cluster. After changing the API version in the kubeconfig file to v1, as you can see below, after getting the error we can now connect to the Kubernetes cluster and get pods.
Concluding
Hopefully this walkthrough of how to install kubectl on Windows and create Kubeconfig file will help any who need to setup their Windows workstation for working with a Kubernetes cluster. The process is fairly straightforward after you copy the files needed into the proper location and configure your Windows PATH variable. The only real flaky thing I saw was the API version in the kubeconfig file copied from the Linux server to the Windows host. After changing the API version to v1 everything started working.


0 Comments