

If you’re a home lab enthusiast or a network administrator working on complex configurations, pfSense port forwarding is an essential skill to master. It allows you to configure your pfSense firewall to redirect incoming traffic from specific ports to internal devices, like web servers, on your network. We will look at how to set up pfSense port forwarding and understand the various components involved.
Understanding Port Forwarding and Its Importance
Port forwarding is a technique to direct incoming traffic from the internet to specific devices on your internal network and their related IP addresses.
By configuring port forwarding on your pfSense firewall, you can grant web traffic requests remote access to internal web servers, game servers, or other services without exposing your entire network to the outside world.
This way, you maintain control over the traffic entering your internal network (TCP and UDP ports) while still providing access to the services you want to share.
Getting Started with pfSense Port Forwarding
Before we dive into the step-by-step guide, ensure you have the following information handy:
WAN IP address: The public IP address assigned to your pfSense firewall by your ISP.
Internal IP address: The private IP address of the device hosting the service you want to access remotely.
Port numbers: The specific port or port range you want to forward (source port range and destination port range)
Protocol: The protocol (TCP, UDP, or both) used by the service.
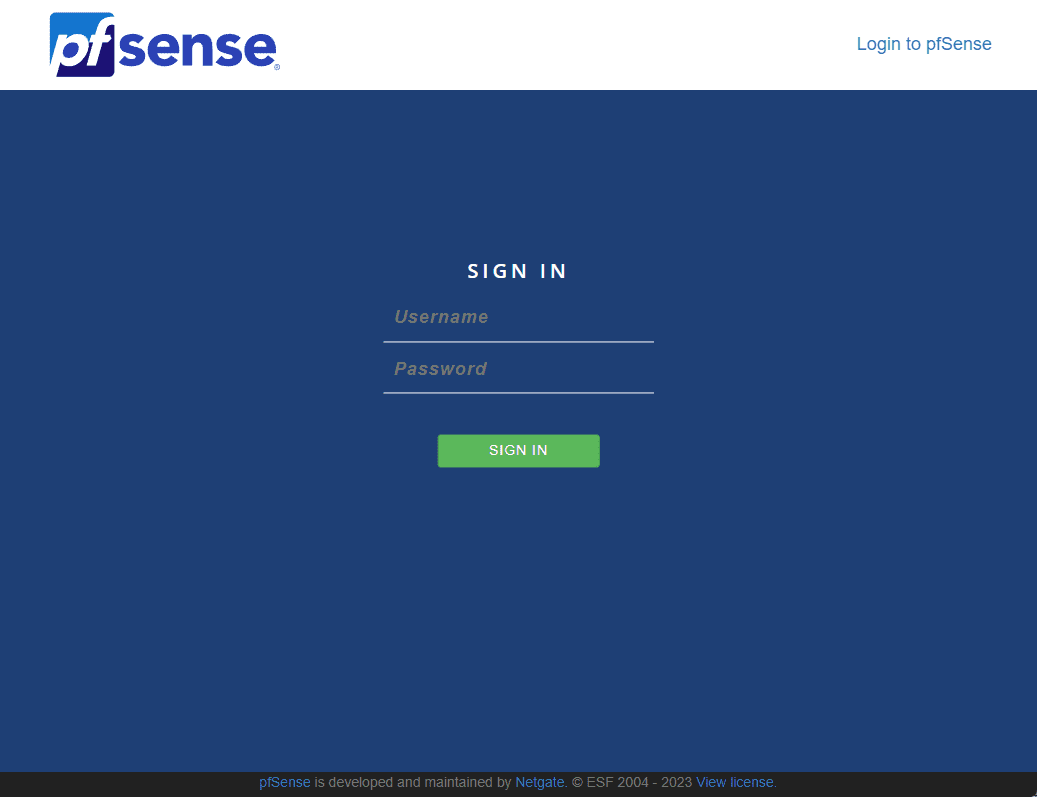
Step 1: Accessing the pfSense Web Interface
To configure port forwarding on your pfSense firewall, you must access the pfSense web interface. Open a web browser and enter the internal IP address of your pfSense firewall. Log in with your username and password.
Step 2: Navigating to the NAT Port Forward Rule
Once logged in, click on the “Firewall” menu and select the “NAT” submenu. Here, you will find the “Port Forward” tab. Click on it to access the NAT port forward rules.
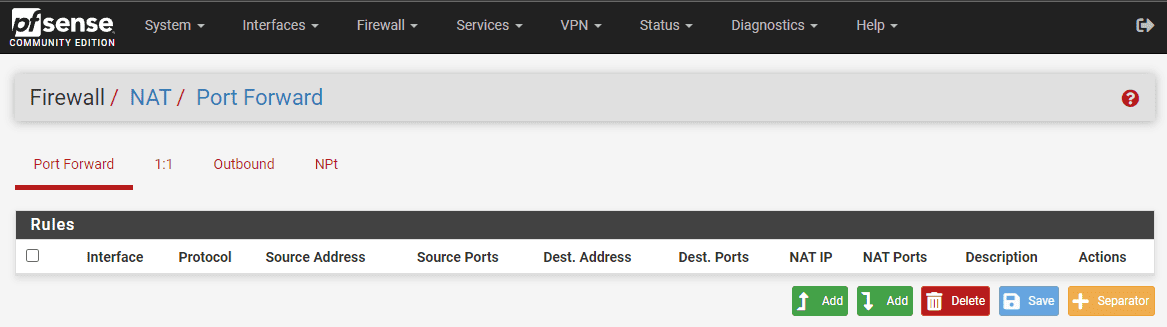
Step 3: Creating a New Port Forward Rule
To create a new port forward rule, click on the green “Add” buttons located at the bottom of the interface and under any rules that are already present. One add button adds rules to the top of the list and the other Add button adds to the bottom of the list. Either button will open a new form where you can configure the port forwarding settings.
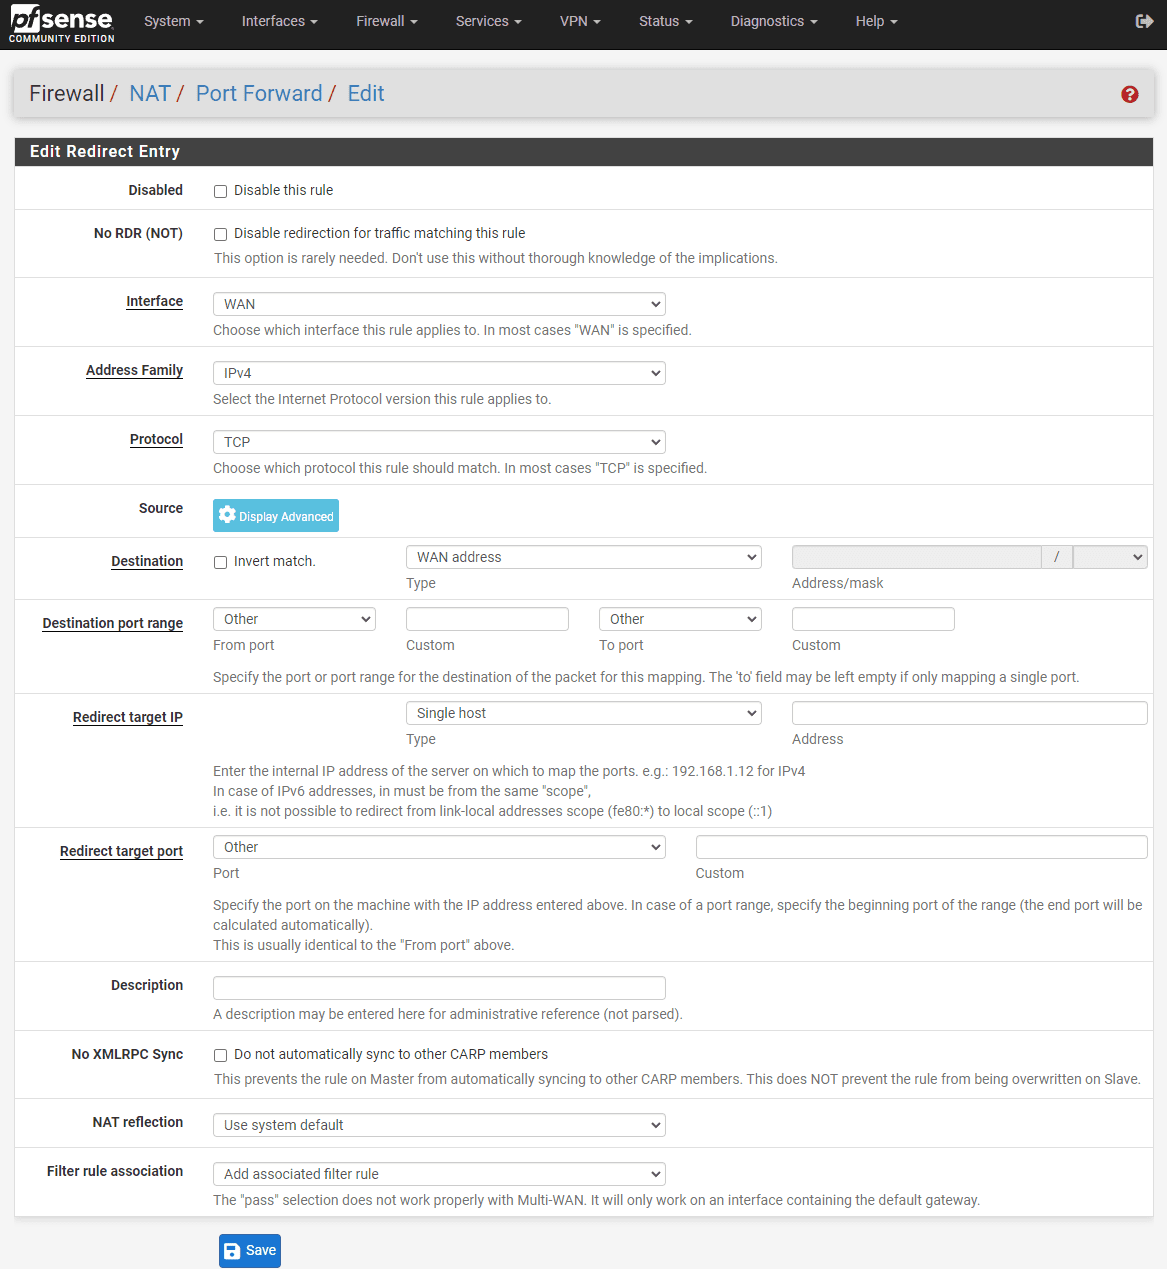
Step 4: Configuring the Port Forward Rule
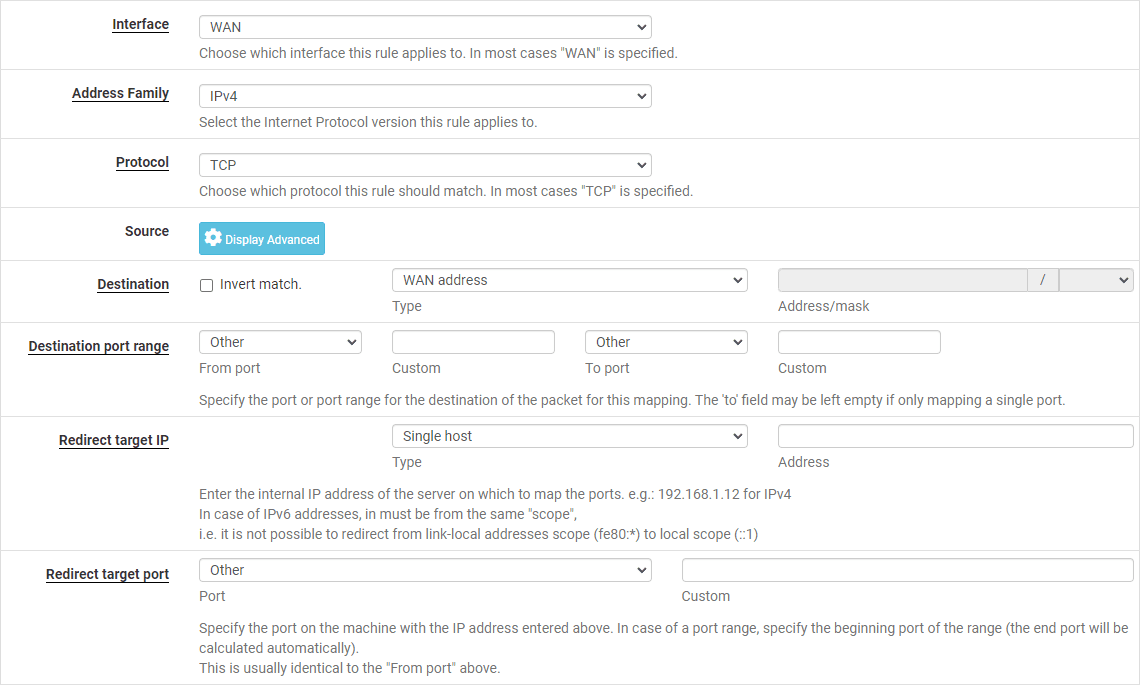
In the “Interface” dropdown menu, select the “WAN” interface. This tells the pfSense firewall to apply the port forward rule to incoming traffic on the WAN interface.
Next, select the appropriate protocol (TCP, UDP, or both) for the service you want to forward. In the “Destination” section, choose “WAN address” as the destination address. This ensures that the port forward rule applies to traffic destined for your WAN IP address.
In the “Destination Port Range” section, enter the port number or port range you want to forward. If you’re forwarding a single port, enter the same port number in both the “From” and “To” fields.
In the “Redirect Target IP” field, enter the internal IP address of the device hosting the service you want to access remotely. In the “Redirect Target Port” field, enter the port number or port range on the internal device that should receive the forwarded traffic.
Step 5: Configuring the Associated Firewall Rule
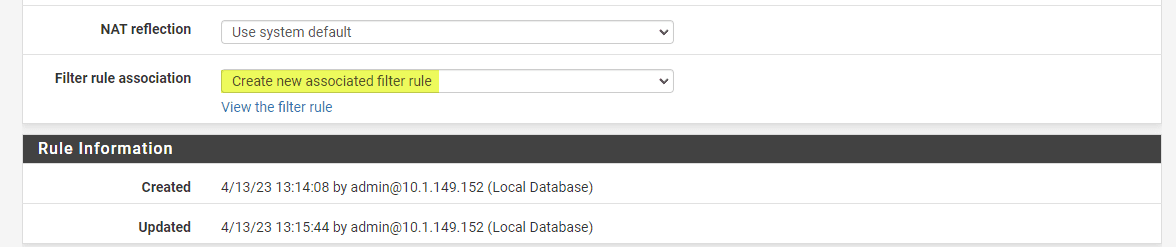
By default, pfSense creates an associated firewall rule for each port forward rule. In the “Filter Rule Association” dropdown menu, ensure that “Add associated filter rule” is selected. This automatically creates a firewall rule allowing the forwarded traffic to reach the internal device.
Step 6: Saving and Applying the Port Forward Rule
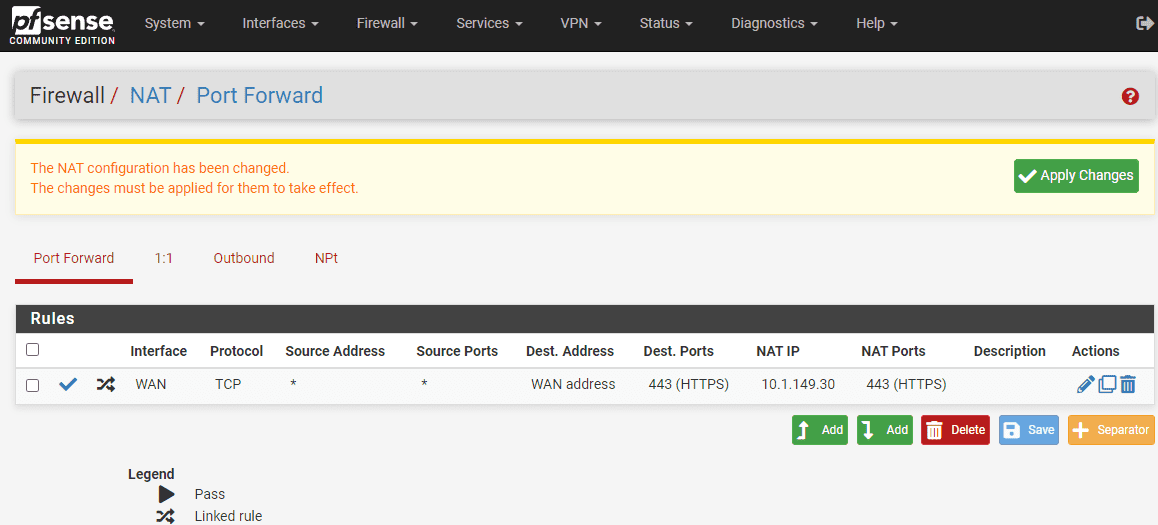
Once you have configured the port forward and associated firewall rules, click on the “Save” button at the bottom of the page.
This will save your new port forward rule. After saving, click on the “Apply Changes” button to apply the new rule to your pfSense firewall. The port forwarding configuration is now complete.

Step 7: Testing the Port Forwarding Configuration
To test if the port forwarding configuration works correctly, try accessing the internal web server or service from a device outside your network using the public IP address and the forwarded port number. You can access the service without any issues if the configuration is correct.
Additional Considerations for pfSense Port Forwarding
Here are some additional points to keep in mind when configuring pfSense port forwarding:
1. Load balancing: If multiple devices provide the same service, you can use pfSense’s load balancing feature to distribute incoming traffic evenly among the devices.
2. Custom port forwarding: Sometimes, you may want to forward traffic from a specific WAN interface port to a different internal device port. To do this, simply enter the desired port number in the “Redirect Target Port” field when configuring the port forward rule.
3. NAT reflection: If you want devices on your internal network to access the forwarded service using the public IP address, enable NAT reflection in pfSense. This feature allows internal devices to connect to the service using the same public IP address and port number as external devices.
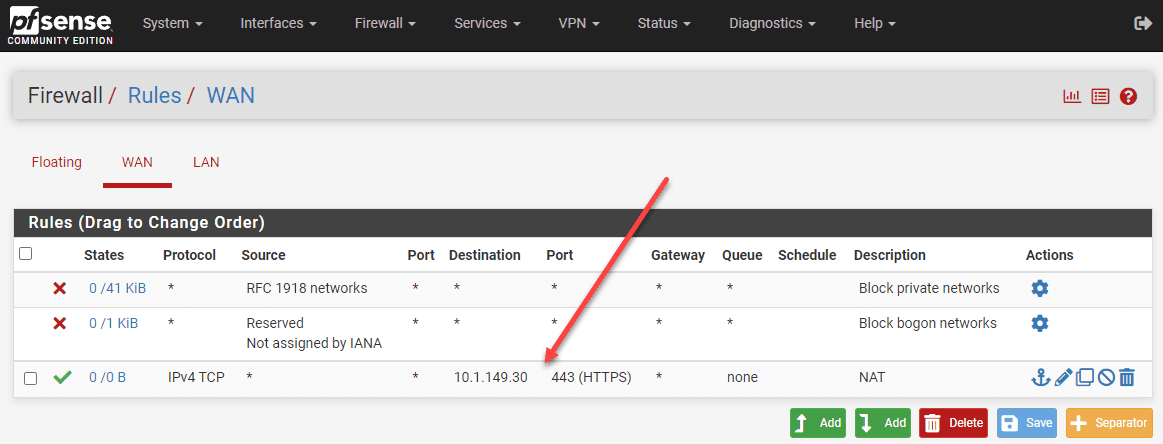
4. Firewall rule order: The order of firewall rules can impact how traffic is processed. Ensure that the associated firewall rule for the port forward rule is placed before any other rules blocking the forwarded traffic.
5. Security considerations: While port forwarding provides a convenient way to access internal services remotely, it exposes these services to potential security risks. Be cautious when forwarding ports and ensure the devices and services you expose are secure and up-to-date.
Configuring pfSense Port Forwarding from the Command Line
For those who prefer using the command line or need to configure port forwarding on a pfSense firewall without access to the web interface, you can use the pfSense shell or an SSH connection to manage the configuration. This section will walk you through configuring pfSense port forwarding from the command line.
Step 1: Accessing the pfSense Shell or Establishing an SSH Connection
To access the pfSense shell, connect to your pfSense firewall using a console cable and a terminal emulation program like PuTTY. Alternatively, you can establish an SSH connection to your pfSense firewall by entering the following command in your terminal or command prompt:
ssh <username>@<internal_IP_address_of_pfSense_firewall>Replace <username> with your pfSense username and <internal_IP_address_of_pfSense_firewall> with the internal IP address of your pfSense firewall. Log in with your password when prompted.
Step 2: Editing the pfSense Configuration File
Once you’re connected to your pfSense firewall, you will need to edit the configuration file located at /conf/config.xml. The config.xml file contains all the settings for your pfSense firewall, including port forwarding rules.
To edit the configuration file, use the built-in vi text editor by entering the following command:
vi /conf/config.xmlStep 3: Adding the Port Forwarding Rule to the Configuration File
In the config.xml file, locate the <nat> section. Within this section, you’ll find the <rule> subsections for existing NAT port forward rules. Add a new <rule> subsection with the appropriate configuration settings to create a new port forwarding rule.
Here’s an example of a port forwarding rule in the config.xml file:
<rule>
  <type>pass</type>
  <interface>wan</interface>
  <protocol>TCP</protocol>
  <destination>
    <any></any>
  </destination>
  <dstport>80</dstport>
  <target>192.168.1.10</target>
  <local-port>80</local-port>
  <descr><![CDATA[Port Forward HTTP]]></descr>
  <associated-rule-id>pass</associated-rule-id>
  <created>
    <time>1649726956</time>
    <username>admin</username>
  </created>
</rule>
Adjust the following elements in the <rule> subsection to match your port forwarding requirements:
<interface>: Set to “wan” for the WAN interface.
<protocol>: Set to “TCP,” “UDP,” or “TCP/UDP” depending on the service.
<dstport>: Set to the destination port or port range you want to forward.
<target>: Set to the internal IP address of the device hosting the service.
<local-port>: Set to the port number or port range on the internal device that should receive the forwarded traffic.
<descr>: Add a description for the port forward rule.
Step 4: Saving Changes and Restarting Services
After adding the port forwarding rule to the config.xml file, save your changes and exit the vi text editor by pressing Esc, then entering :wq and pressing Enter.
Finally, restart the pfSense firewall and related services to apply the new port forwarding rule:
pfSsh.php playback svc restart firewallYour new port forwarding rule is now active, and you have successfully configured pfSense port forwarding from the command line.
Keep in mind that editing the config.xml file manually can be risky, as any mistakes could cause issues with your pfSense firewall’s configuration. Always back up the configuration file before making any changes, and verify your edits before saving and applying them.
Step 5: Testing the Port Forwarding Configuration
To test if the port forwarding configuration is working correctly, try accessing the internal web server or service from a device outside your network using the public IP address and the forwarded port number. You can access the service without any issues if the configuration is correct.
Conclusion
The pfSense solution is a great open-source firewall that is tried and tested across many different landscapes, including home lab enthusiasts and enterprise environments. It provides a robust set of features, including port forwarding, allowing you to control and allow traffic to specific resources in the internal network while protecting others.
You can use the GUI and command line to configure pfSense port forwarding in your environment to set up allowed traffic from the Internet to internal resources. Remember the security implications of allowing external traffic to internal resources, and ensure you have additional security layers in play.


0 Comments